
In the field of medical testing, ultrasonic bone density meters are widely used in bone density screening work in medical institutions at all levels due to their advantages such as no radiation and no trauma. However, to obtain accurate test results, it is crucial to operate the bone density meter in a standardized and proficient manner. Next, we will introduce in detail the three key steps for operating an ultrasonic bone density meter.
1. Accurately locate the detection area
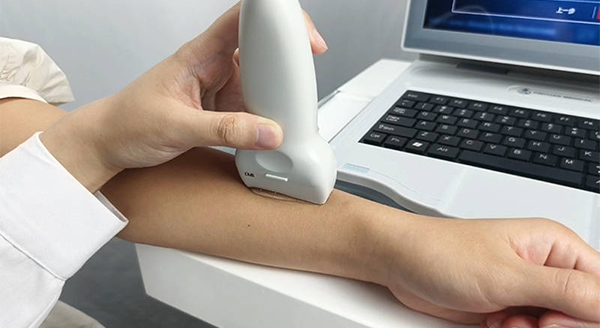
The common detection sites of ultrasonic bone densitometers are the radius and tibia.
Radial bone localization
The examinee’s arm posture: The examinee is required to straighten their forearm, make a gentle fist, and slightly raise their thumb. This posture can fully expose the radius, facilitating the operator’s positioning and subsequent detection.
The positioning method for the distal one-third of the radius: Use a dedicated positioning ruler, starting from the elbow of the examinee and measuring along the outer side of the arm towards the tip of the middle finger (note that the length of the nail should not be included during the measurement). Measure one-third of the total length of this section and clearly mark it with a marker pen. This marking position is the standard measurement point at the distal one-third of the radius. This area has significant reference value for reflecting the bone density status of the human body. During the positioning process, it is necessary to ensure the accuracy of the scale measurement and the clear visibility of the marks, providing a reliable foundation for the subsequent detection steps.
Tibial localization
The examinee’s position: Guide the examinee to stand or sit comfortably on a chair, allowing their legs to hang naturally. This posture can keep the tibia in a relatively relaxed and stable state, which is convenient for subsequent detection operations.
Specific positioning point: The middle section of the tibia is selected as the key position for detection. Generally speaking, the middle section of the tibia is located in the area near the midpoint of the line connecting the knee and ankle joints. To determine this position more accurately, professional human bone measurement tools can be used to measure along the anterior surface of the tibia, starting from below the knee joint, and mark at the halfway point. This marking point is the appropriate detection area. In actual operation, it is necessary to ensure the accuracy of positioning and avoid affecting the reliability of the detection results due to positional deviations.
Second, precisely adjust the probe pressure
The contact state between the probe and the skin at the detection site directly affects whether the ultrasonic waves can be effectively transmitted and the accuracy of the detection results. Adjusting the probe pressure is a key link to achieve good contact.
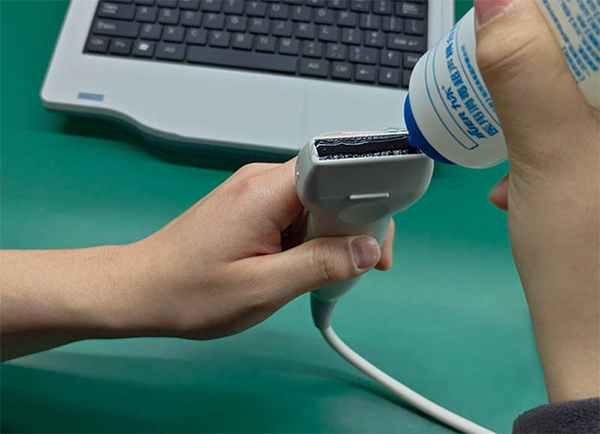
Apply coupling agent
Before placing the probe at the detection site, apply an appropriate amount of ultrasonic coupling agent. The function of the coupling agent is to fill the tiny gap between the probe and the skin, reduce the obstruction of air to the propagation of ultrasonic waves, ensure that the ultrasonic waves can smoothly enter the human skeleton from the probe and effectively reflect back to the probe.
Adjust the probe pressure
Place the probe: Gently press the probe coated with coupling agent vertically onto the marked point of the detection area. During the placement process, the movements should be gentle and stable to avoid uneven distribution of the coupling agent due to the shaking or tilting of the probe, which may affect the transmission of ultrasonic signals.
Pressure control: The pressure of the probe should be moderate. It should neither be too high to avoid discomfort to the examinee nor too low to prevent the probe from making tight contact with the skin, creating an air gap and hindering the propagation of ultrasonic waves. The operator observes the degree of adhesion between the probe and the skin to ensure that the probe is closely attached to the skin without excessive pressure, achieving good ultrasonic conduction.
Three. Proficient in operating software
The operating system design of Pinyuan Medical’s ultrasonic bone density meter is in line with clinical operation habits. Familiarity with its functions and processes can effectively improve the efficiency of detection and the accuracy of results.
To turn on the equipment: Turn on the power switches of the ultrasonic bone density meter’s main unit, display, and printer (if a report needs to be printed) in sequence. After turning on the power, wait for the instrument to perform self-detection and initialization processes, which usually take several seconds to tens of seconds. During this period, a series of startup screens and related prompt information will be displayed on the instrument screen. The operator needs to pay close attention to ensure that the instrument startup process goes smoothly without any error messages appearing.
Login and parameter Settings: After the instrument is started up, enter the login interface of the operation software. Operators log in with the pre-assigned account and password. After a successful login, they first need to set some common parameters. These Settings include adding the name of the hospital, setting the names of the operating doctor and the doctor sending the test, so as to accurately record the relevant information in the test report. In addition, it is necessary to set the commonly used terms in the medical record according to actual needs, so as to facilitate quick access when inputting the information of the examinee later and improve work efficiency.
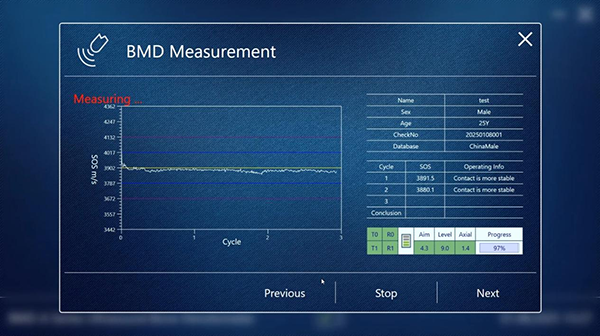
To start the measurement: After completing the above Settings and “verification”, click the “Start Measurement” button on the software interface. At this point, the ultrasonic bone densitometer starts to emit ultrasonic waves to test the bones at the examined site. During the measurement process, the person being inspected is required to remain still. Meanwhile, the operator needs to closely monitor the data acquisition progress bar on the instrument screen and wait for the measurement process to be completed automatically. Generally, a complete measurement process may take several seconds, and the exact time depends on the model of the instrument and the individual differences of the person being tested.
Repeated measurements (if necessary) : To enhance the accuracy and reliability of the test results, in some cases, multiple repeated measurements may be required. For instance, when the data obtained from the first measurement fluctuates significantly or does not match the clinical symptoms and expected results of the examinee, the “Repeat Measurement” function can be selected on the software interface, and the measurement can be conducted again following the same operation steps.
Although the operation of an ultrasonic bone density meter may seem complex, as long as these three key steps are strictly followed, namely precisely locating the detection site, finely adjusting the probe pressure, and proficiently operating the software, while paying attention to various details and precautions during the operation process, the bone density detection work can be completed efficiently and accurately, providing reliable basis for bone health.
# Ultrasonic Bone Densitometer #
Post time: Sep-01-2025